Post-installazione
Dopo aver eseguito l'installazione su Windows, fai semplicemente clic sul pulsante "Avvia I2P" che richiama la router console, che contiene ulteriori istruzioni.
Sui sistemi Unix e simili, I2P può essere avviato come un servizio usando lo script "i2prouter" che si trova nella cartella che hai selezionato per I2P. Accedere a quella cartella in un terminale ed eseguire il comando "sh i2prouter status" dovrebbe indicarti lo stato del router. Gli argomenti "start", "stop" e "restart" controllano il servizio. Puoi accedere alla router console nella sua posizione usuale. Gli utenti su OpenSolaris e altri sistemi per i quali il wrapper (i2psvc) non è supportato dovrebbero invece avviare il router con "sh runplain.sh".
Quando lo installi per la prima volta, ricorda di regolare il tuo NAT o firewall se puoi, tenendo presente le porte usate da I2P per l'accesso a Internet, descritte qui tra le altre porte. Se hai aperto correttamente la porta per il traffico TCP in entrata, attiva il traffico TCP in entrata anche nella pagina di configurazione.
Inoltre, esamina e modifica le impostazioni della larghezza di banda nella pagina di configurazione, perché le impostazioni predefinitie di of 96 KBps per il download e 40 KBps per l'upload sono abbastanza lente.
If you want to reach I2P Sites via your browser, have a look on the browser proxy setup page for an easy howto.
A web browser will need to be configured to access sites and services on the I2P network, and to utilize outproxies. Below are walkthroughs for some of the most popular browsers.
Profilo Firefox per Windows
If you are using Windows, the recommended way of accessing the I2P network is using the Firefox profile.
If you used the Easy-Install bundle, the Firefox profile is included and you can skip this page.
If you do not wish to use that profile or are not on Windows, you will need to configure a browser.
How To Configure Your Browser
Firefox
Configurazione mediante estensione: I2P in Private Browsing
È attualmente in fase di test un nuovo metodo per configurare automaticamente il Browser I2P. Tale metodo utilizza le "Schede Contenitore" di Firefox per creare strumenti per la navigazione privata, da utilizzare con I2P e le sue applicazioni.
Questo metodo preconfigura il tuo browser abilitando alcune impostazioni della privacy come la resistenza al fingerprint e rinforzando l'utilizzo del WebRTC da parte del proxy. Contiene inoltre menù, scorciatoie e strumenti di monitoraggio per migliorare l'intergrazione di Firefox con I2P. Non dovrebbe interferire in modo sostanziale con le tue schede Firefox non-I2P.
L'estensione, I2P in Private Browsing, può essere ottenuta tramite il negozio di componenti aggiuntivi di Mozilla.
Il codice sorgente dell'estensione è disponibile sui2pgit.org.
Istruzioni per Firefox 57 e successivi
From the Menu button in the top right, select Preferences. Scroll down until you see the Network Proxy section, as shown in the screenshot below. Click on Settings

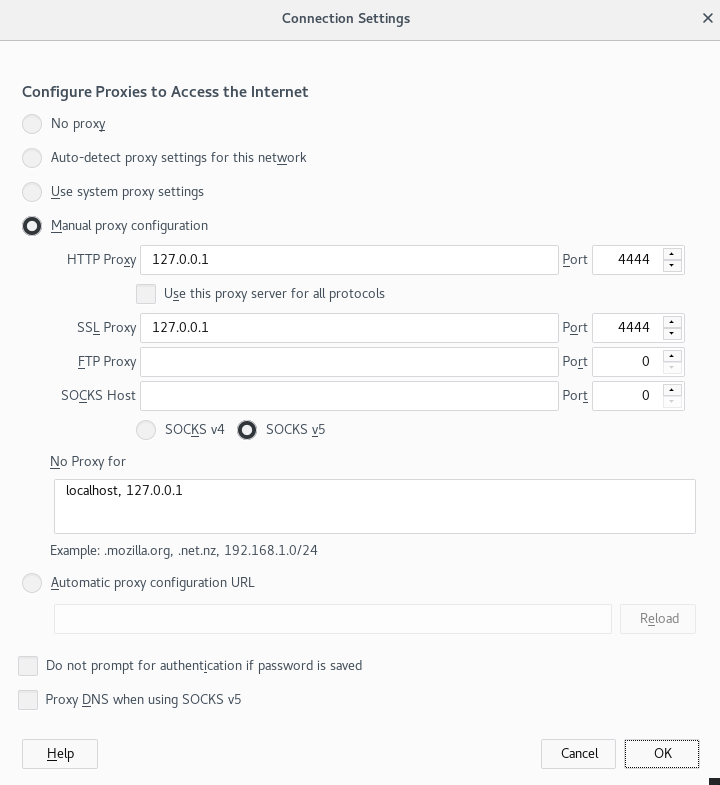
In the Connection Settings pop-up, select Manual proxy
configuration. Set both the HTTP and SSL Proxy to address
127.0.0.1 with port 4444 as shown in the following screenshot.
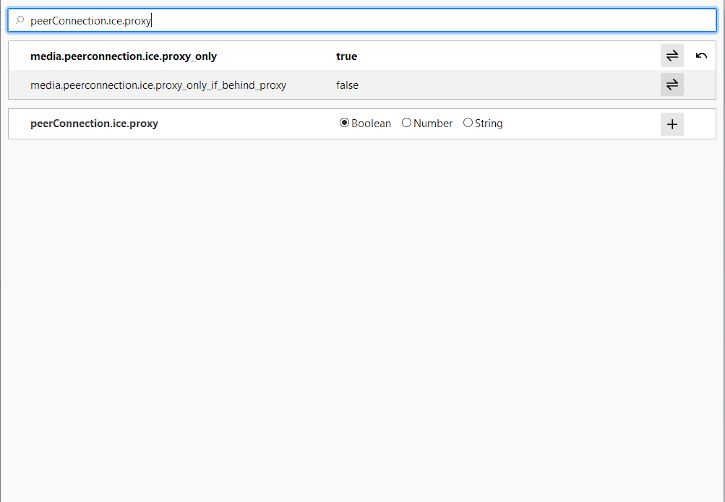
Finally, go to the address about:config and find the property media.peerConnection.ice.proxy_only. Ensure that this setting is True. Now find the property keyword.enabled, and set it to False.
Chrome
Extension-based Configuration: I2PChrome.js(Experimental, additional configuration)
An experimental, partially-automated configuration process for Chrome is available. In order to configure it, create a new Profile especially for your I2P browsing, separate from the default profile. Then install this Extension in your newly-created profile. This profile is now configured to use I2P. Highly detailed instructions are available at the homepage.
All Chrome Versions
Chromium-Based Browsers like Chrome have slightly different places for their proxy settings depending on variant and platform. These instructions may be slightly different in Brave or Iridium, for instance. From the Main menu, navigate to the Settings, and search for the menu item. Clicking it will open the right settings for your platform.
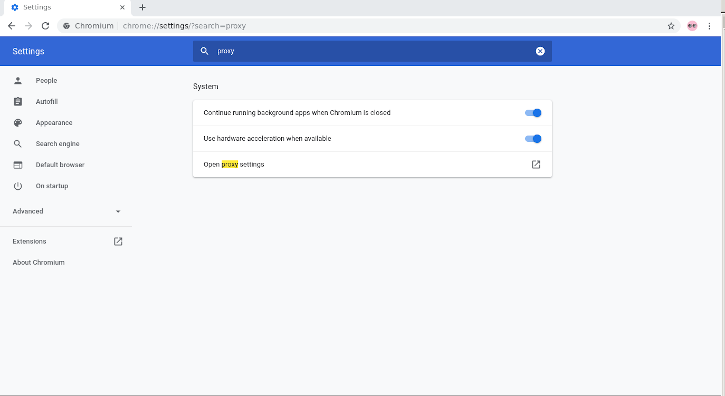
On Windows, this button will launch you into the shared proxy settings used by Internet Explorer, and you can configure it by following the Internet Explorer 8 guide.
IceRaven and other Firefoxes for Android
Extension-based Configuration
Modern Firefoxes(The "Fenix" based Firefoxes) do not generally have an about:config page for you to configure proxy settings manually. It is further not possible to use most extensions in Fenix-based Firefoxes. It is possible to enable support about:config and enable more extensions in Firefox Nightly at the time of this writing, but it's a manual and difficult process. IceRaven is a fork of Firefox which enables a collection of extensions while Mozilla and the Mozilla Community work on adding support for extensions to Firefox for Android. It provides the easiest way of configuring a modern Firefox-based Browser for Android. It does not come from Mozilla and carries no guarantees from them. Installing the extension in IceRaven will proxy all your IceRaven browsing over I2P.
If you have not installed IceRaven yet, go to the next step. If you have been using IceRaven for a while, go to the main menu, select the History tab, and make sure that you have cleared information about your past browsing by tapping the "Delete History" button.
Open the IceRaven main menu, and scroll to the top until you see the "Add-Ons" submenu. Tap the "Add-Ons Manager" option in the "Add-Ons" submenu. Install the extension named I2P Proxy for Android and other Systems.
Your IceRaven browser is now configured to use I2P.
This extension also works in pre-Fenix(Pre-Firefox-68) Firefox based web browsers, if installed from the following addons.mozilla.org URL. I2P Proxy for Android and Other Systems
This extension is identical to the Chromium extension and is built from the same source.
In order to enable extension support in Firefox Nightly, you should follow the steps provided by Mozilla on their Blog
Internet Explorer
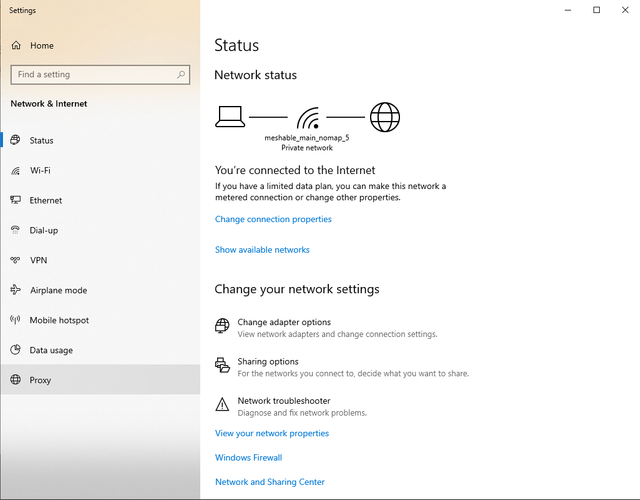
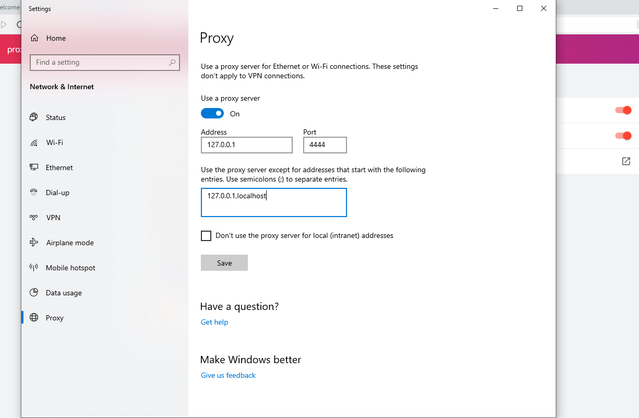
In the start menu search for the the "Network and Internet Settings" to open the settings. The last entry in the menu is the Proxy Settings, click it to your proxy to connect to I2P.
Ora spunta la voce "Usa un server proxy per la tua LAN" e anche la voce "Non usare un server proxy per gli indirizzi locali". Premi sul bottone "Avanzate", che mostrerà la finestra per aprire le porte. Inserisci i valori come nell'immagine: IP 127.0.0.1 e porta 4444 per l'HTTP, porta 4445 per l'HTTPS. Premi "OK" per salvare le impostazioni. Adesso il tuo browser è pronto per usare il proxy I2P.
Termini di servizio del proxy di uscita
The I2P network is a peer-to-peer overlay network. Proxying to the clearnet is not part of its design or function with regards to its communication protecting network features.
The I2P Project itself does not run any proxies to the Internet. The I2P software includes a default outproxy: exit.stormycloud.i2p. These are run by StormyCloud Inc.
https://stormycloud.orgBy default, I2P comes with one outproxy configured: exit.stormycloud.i2p.
I2P Sites that are accessible via .i2p addresses are also not allowed via the outproxies.
Tor provides a browser to use as an outproxy to the Internet.


